Reading Notes: "Linux System Build and Operations for Professionals"
→ 日本語版を読む- Overview
- Chapter 1: Linux Server Basics
- Chapter 2: Server Operations Basics
- Chapter 3: Linux Storage Management
- Chapter 4: Linux Network Management
- Chapter 5: Process Management
- Chapter 6: Linux Server Troubleshooting
- 6.1.3 System Log Collection
Overview
I'm noting down important points from "Linux System Build and Operations for Professionals."
I had been meaning to post this for a while but kept putting it off. I've only completed notes partway through, but I'm posting it now rather than leaving it indefinitely.
Chapter 1: Linux Server Basics
However, this is only from the perspective of ordinary Linux users. A system administrator who builds and operates Linux servers must properly configure physical hardware loaded with various devices to create a "virtual computer." For this reason, it is important to understand the hardware components behind the "virtual computer" and know how Linux transforms them into that "virtual computer." Understanding Linux is essentially the same as understanding this "transformation mechanism."
Each server hardware has a supported Linux distribution and its version defined. When using enterprise servers, you need to pay attention to such support information.
When installing Linux for server use, you also need to pay attention to the disk partition layout. In Linux, the installation disk is divided into multiple partitions, but unless there is a special reason, it is advisable to keep the partitions to those shown in Table 1.4. Older Unix servers used to separate directories like /var and /usr into individual partitions, but this is not necessary with Linux.
| Partition | Description |
|---|---|
| Boot partition | "/boot" directory |
| Root partition | "/" directory |
| Swap partition | Swap area |
| kdump partition | Output destination for kdump dump files |
| Home partition | "/home" directory |
| Data partition | Application data area |
Partition sizes are considered as follows. The boot partition stores the kernel itself, the initial RAM disk, and files related to GRUB2. The recommended size in RHEL7 is 500MB, which is generally sufficient. For the root partition, allocate enough space for the RPM packages to be installed and the application software to run. Even with all RHEL7 bundled RPM packages installed, 10GB is sufficient. If using external storage for the application data area (i.e., not using the "data partition" in Table 1.4), you can allocate all remaining space after other partitions to the root partition.
From a performance perspective, it is preferable to avoid using the swap area as much as possible, so for enterprise servers it is common to estimate memory usage in advance and install sufficient physical memory. In theory, this makes a swap area unnecessary. However, since memory can be consumed in large amounts as disk cache, it is advisable to prepare a swap area of around 2GB to 4GB for safety.
The kdump partition is used as the output destination for kernel dump files, as described in "6.2 Obtaining Kernel Dumps." By default, dumps are saved under /var/crash in the root filesystem, so creating a kdump partition is not strictly necessary. However, if the root filesystem runs out of space, dump file saving may fail. Providing a dedicated kdump partition ensures sufficient storage capacity. Allocate roughly twice the size of the physical memory for the kdump partition. The home partition is used as home directories for regular users under /home. Whether to create a home partition depends on the intended use of the server. If multiple users will log in and save personal files to their home directories, a home partition prevents the root filesystem from running out of space due to large amounts of personal files. On the other hand, if the server is used for typical server purposes without storing personal files from general users, the home directory can be created on the root filesystem without issue. If you do provide a home partition, set its size according to the disk capacity you want to use as home directories.
Finally, the data partition is used for directories where data volume continuously grows during operation, such as application data storage. Estimate the maximum data volume in advance and size it so that capacity does not run out during operation. If the maximum data volume cannot be determined in advance, it is better to prepare a separate disk dedicated to data storage rather than using a data partition. In that case, use the Logical Volume Manager (LVM) described in "3.2 LVM Configuration and Management" so the data area can be expanded later. Note that when using the RHEL7 GUI installer, the default configuration uses LVM rather than disk partitions. It is recommended to switch to a partition-based configuration during installation. Using LVM complicates system backup procedures described in "2.2 Backup" and makes recovery more difficult if a filesystem failure occurs. While LVM offers the advantage of expanding filesystem size later, it is fundamentally wrong to place data that grows over time in the system area. Clearly separating areas with fixed data volume from areas with increasing data volume is the basis of disk management.
All software included with Red Hat Enterprise Linux is provided as RPM packages. Each package has a version number, and new versions are provided when bugs are fixed or security issues are addressed. For internet-connected servers, registering with Red Hat Network allows you to obtain the latest RPM packages from the online repository. Registration with Red Hat Network is done using the subscription-manager command.
Some device drivers provided by server vendors have restrictions on the kernel version that can be used. When using a specific kernel version, perform updates by specifying the version number. Running the following command first displays all versions of the package stored in the repository.
Next, create personal user accounts for login. When logging into a server to perform work, you should not log in directly as root. Instead, log in as a personal user and switch to root only when necessary. This is to make it clear who worked on the server. Since multiple people may log in to an enterprise server to perform work, you should be able to check the login history afterward to determine who logged in and worked when. Also, add users who need root access to the wheel group. This allows them to switch to root using the sudo command without knowing the root password. Sharing the root password among multiple people makes changing the password cumbersome and increases the risk of leakage, so this practice should be avoided.
Login and sudo command execution history is recorded in the log file /var/log/secure. By examining this file, you can determine which users logged in and switched to root and at what time.
The minimum security settings to implement immediately after installation are prohibiting root login and configuring the firewall. As explained earlier, when logging into Linux to perform administrative tasks, log in as a personal user and switch to root only when necessary. To enforce this, systemically prohibit direct root login via the SSH daemon configuration. Specifically, open the configuration file /etc/ssh/sshd_config and change the relevant section shown in Figure 1.13.
In the default state immediately after installation, only ICMP packet reception and SSH connections (TCP port 22) are permitted from the outside. However, it is important not to rely on defaults but to understand the specific configuration. In RHEL7, for firewall functionality, you can choose either the new "firewalld service" or the traditional "iptables service." The default is firewalld.
When iptables rejects incoming packets from the outside, a message like the one in Figure 1.15 is recorded in the system log /var/log/messages. The source IP address (SRC), source port number (SPT), destination IP address (DST), and destination port number (DPT) are recorded, allowing you to see which terminal accessed which port.
Chapter 2: Server Operations Basics
A system monitoring tool running on the monitored server is called a "monitoring agent." This may be a program bundled with a specific system management product or a standalone simple tool. Handmade shell scripts are also perfectly valid monitoring agents. Monitoring agents perform log file monitoring (watching content output to log files), process monitoring (monitoring the operating status of processes on Linux), and resource monitoring (monitoring system resource usage). They can also collect information from system management processors, as described later.
As an example of a monitoring agent, I'll introduce "logmon," a script specialized for log file monitoring. It monitors writes to log files specified in a configuration file and, upon finding a predefined string, executes a corresponding command. This command can send a notification email to the server administrator or send a message to an external system management server.
Monitoring configuration is described in the configuration file /etc/logmon/logmon.conf.
The tool sysstat collects system operational information centered on resource usage. It has long been used on Linux and is included as a standard package in RHEL7. Installing the sysstat RPM package with the following command adds a cron job entry to /etc/cron.d/sysstat and begins data collection.
The sysstat package includes standard commands for collecting system operational information, such as the iostat command. It is strongly recommended to install it whenever you build a new server.
On Linux, using the standard rsync command makes it easy to perform file-level data backups. Periodic backups can also be implemented using cron jobs.
The rsync command can also copy files to a remote server over the network.
To do this, the rsync RPM package must also be installed on the remote server. SSH connections are used internally for file transfers to the remote server.
psacct records all commands and processes executed on Linux. Specifically, at process termination, it records information such as the executing user and time to a binary history file /var/account/pacct. Using the lastcomm command, you can review the history of executed processes based on recorded information.
PAM (Pluggable Authentication Module) is a plugin module that provides user authentication-related functionality to software running on Linux. By providing a common user authentication mechanism to multiple applications via PAM, system administrators can centrally manage user authentication. For example, by changing PAM settings, you can switch the authentication method at system login from local authentication via shadow files to LDAP authentication, or specify a password policy (e.g., minimum character count) during password changes.
The PAM modules used by each piece of software (program) are described in the configuration file /etc/pam.d/<program-name>. For example, for the SSH daemon, it is /etc/pam.d/sshd. For programs without a corresponding configuration file, the settings in /etc/pam.d/others apply.
How much detail to include in configuration documents depends on the system's importance and operational policy, but as a Linux server administrator, you should at minimum maintain the following documentation: server hardware physical configuration and system BIOS/firmware versions; physical connection diagrams with network equipment and external storage devices; logical disk configuration (RAID configuration, etc.); OS basic configuration information (for Red Hat Enterprise Linux, information collected in bulk by the sosreport command); network configuration information (hostname, IP addresses, etc.); information about additionally installed tools and settings intentionally changed from defaults.
Chapter 3: Linux Storage Management
A Storage Area Network creates a logical connection independent of the physical connection between a server and a storage device. Also called SAN (Storage Area Network). This makes it possible for multiple Linux servers to share a high-performance large-scale storage device. Storage devices that support SAN connections are generally called "SAN storage."
Many SAN storage devices have physical and logical copy capabilities for LUNs. Physical copy copies the contents of an existing LUN as-is to a LUN of the same size. During physical copy, the filesystem on the source LUN should be unmounted on the server side. Copying while mounted does not guarantee data consistency within the filesystem. The time to complete the copy operation increases with the LUN capacity, and the LUN is unavailable to the server during this time. Logical copy creates an apparently equivalent LUN to physical copy from an existing LUN, but without actually copying the data. The actual copy occurs when a write is made to either the source or destination LUN. There are two methods: one that pre-allocates a differential storage area for the resulting differences from writes, and one that dynamically allocates necessary data blocks. The dynamic allocation method is described in detail in "3.3.1 dm-thin Operating Principles," so here I'll explain the mechanism using a differential area. With this method, when a logical copy is created from an existing LUN, a differential area is allocated as shown in Figure 3.6. Afterward, when a write occurs on either LUN, the blocks to be written are copied to the differential area before the actual write is performed. Figure 3.6 shows the case where a write is made to the source LUN, but if a write is made to the destination LUN, the write goes to the blocks in the differential area. When reading data from the destination LUN, if there is no differential in the differential area, the data is read from the source LUN. If there is a differential, the data is read from the differential area.
A note about the differential area mechanism: if the differences between source and destination grow large and the differential area runs out, the destination LUN becomes unusable. For this reason, it is common practice to use the destination area as an intermediate area for data backup.
How does this differ from directly creating LUN③ from LUN① via physical copy? With this method, once LUN② is created via logical copy, LUN① can immediately resume use by applications. There is no need to stop applications for an extended period during physical copy. Alternatively, as shown in Figure 3.7, you can map the logically copied LUN to a backup server and write data to tape. In this case, the application downtime for the data backup is only the few seconds needed to complete the logical copy.
Managing data area disks with Linux's LVM (Logical Volume Manager) provides advantages such as combining multiple physical disks into one large filesystem or expanding the filesystem size later.
Linux LVM manages disks using three concepts: Physical Volume (PV), Volume Group (VG), and Logical Volume (LV). Individual devices recognized by Linux (such as /dev/sdb) are called "physical volumes." Multiple physical volumes are combined into a group called a "volume group." Inside the volume group, logical devices called "logical volumes" are created.
In a non-LVM environment, the entire disk is divided into multiple partitions, but in an LVM environment, one logical volume corresponds to one partition.
As preparation, install the lvm2 RPM package required for LVM and restart the server.
The following command is an example of creating volume group vg_data01 from two LUNs /dev/sdb and /dev/sdc, and then creating logical volume lv_data01.
The pvcreate command registers /dev/sdb and /dev/sdc as physical volumes managed by LVM. The vgcreate command creates volume group vg_data01 from physical volumes /dev/sdb and /dev/sdc. The final lvcreate command creates a 5GB logical volume lv_data01 inside volume group vg_data01.
The created physical volumes, volume groups, and logical volumes are verified using the pvs, vgs, and lvs commands respectively.
Alternatively, the pvdisplay, vgdisplay, and lvdisplay commands display more detailed information. Physical volumes (LUNs) managed by LVM via the pvcreate command are assigned a unique ID number called a UUID, and the UUID along with LVM configuration information such as the volume group is stored in the metadata area at the beginning of the LUN. The UUID of a physical volume can be confirmed with the pvdisplay command shown earlier. Next, format logical volume lv_data01 with the XFS filesystem and mount it to the directory /data.
When adding an entry to /etc/fstab to automatically mount on system startup, you can use the device file name /dev/vg_data01/lv_data01 or other identifiers.
The lvextend command adds 2GB of capacity to the existing logical volume /dev/vg_data01/lv_data01. At this stage, the filesystem size inside the logical volume has not yet been expanded. The following xfs_growfs command expands the filesystem size to match the logical volume size. Note that the xfs_growfs command is executed with the filesystem mounted, by specifying the mount point. If the capacity of the physical volumes in a volume group is insufficient, you can add a new physical volume. The following is an example of creating physical volume /dev/sdd and adding it to the existing volume group vg_data01.
This illustrates the state transitions of a volume group. Volume groups broadly have two states: "Imported" and "Exported." During normal use, the state remains Imported without change.
When the volume group state is Available, the filesystems in the logical volumes it contains can be mounted and used. Immediately after Linux starts, the volume group state is Notavailable, but it is automatically set to Available as part of the startup process by the vgchange command. To change to Notavailable, unmount all logical volume filesystems in the volume group first. Changes to logical volume names or volume group names are made in the Notavailable state.
Transitioning to the Exported state is used when removing the physical disks comprising a volume group from a server and attaching them to another server. Use the following commands to change between Exported and Imported states for a volume group in the Notavailable state.
A volume group in the Exported state is recognized as outside LVM management, so the corresponding physical disks can be safely removed from the server and moved to another server.
Chapter 4: Linux Network Management
In previous versions, such information was checked using the arp command and ifconfig command, but in RHEL7, the net-tools RPM package providing these commands is no longer installed by default, and the ip command is now used as the replacement.
In RHEL7, network configuration is managed by the NetworkManager service, and settings are configured using the nmcli command.
In older Linux, NIC device names traditionally used names like "eth0" and "eth1." In this case, when the Linux server starts, the Linux kernel assigns device numbers in the order it recognizes the NICs. Therefore, which NIC gets which device name depends on the server configuration. On the other hand, RHEL7 introduced a mechanism called "Predictable Network Interface Names," where fixed device names are assigned based on the physical location of the NIC. Specific examples include device names like "eno1," "enp0s25," and "wlp2s0." Recent server hardware has system BIOS (or UEFI) that provides logical numbers for NICs installed in the server, and these do not change based on system configuration. Therefore, Linux also uses these logical numbers to assign NIC device names.
The approach to network configuration/management via NetworkManager is explained as follows. NetworkManager has the characteristic of separately defining "devices" representing each NIC, and "connections" indicating the configuration settings applied to them. By linking a "device" with a "connection," the configuration is applied to the device (Figure 4.16). It is also possible to pre-define multiple connections and switch the network configuration of a device by changing which connection is linked to it. This is a feature intended for environments where network connections change frequently, such as a Linux desktop environment on a laptop. Additionally, these network configuration changes can be made while the server is running. The server does not need to be restarted to apply configuration changes.
When network settings are configured during installation, a connection with the same name as the device name is prepared this way. However, the device name and connection name do not necessarily need to match.
At this point, a file describing the connection settings is prepared as /etc/sysconfig/network-scripts/ifcfg-eno2-con. Note that while older Linux prepared a configuration file per device, here configuration files are prepared per connection, not per device.
The content specified in ipv4.dns and ipv4.dns-search is reflected in the nameserver and search entries of the name resolution configuration file /etc/resolv.conf.
Multiple IP addresses can also be configured. When assigning multiple IP addresses to a single NIC, a mechanism called "IP alias" was previously used. NetworkManager achieves the same thing with a feature called secondary IP addresses. The configuration is simple: just specify multiple IP addresses separated by commas as shown below.
In "4.1.1 IP Network Basics," I explained how packets are forwarded on an IP network, but IP networks themselves have no mechanism to guarantee that packets reached their destination. For example, if a router along the forwarding path is down, the packet is lost there. Also, when communicating with an application on a server, simply specifying the destination IP address identifies the server but not which application the packet is destined for. "Socket communication" solves these issues. Socket communication is a mechanism for applications to communicate over an IP network, with two types of protocols: "TCP" and "UDP." In socket communication, server applications and client applications are distinguished. A server application process continuously accepts connections from the network, and client applications connect to it. The mechanisms of socket communication are fundamentally content for application programmers to understand, and Linux server administrators do not need to be too aware of them. However, when network-related application problems occur, it may be necessary to check the state of socket communication on Linux. In some cases, it may be necessary to check kernel parameters related to TCP connections as explained later. Here I explain the basic aspects of socket communication that a Linux server administrator should understand.
At this point, communication partners are identified by the pair of "server's IP address and port number, and client's IP address and port number." In general, the combination of "IP address and port number" is called a "socket." The difference between TCP and UDP is whether a "session" is established before communication begins. Simply put, a client application using UDP simply sends a packet specifying an IP address and port number without checking whether the server application is running. If there is no response from the application, it is indistinguishable whether the packet didn't arrive due to a network problem or the application failed to respond. Processing such as retransmitting packets when there is no response must be implemented in each application. When communicating using TCP, on the other hand, a session is established between the server application and client application beforehand using the method described below. Once a TCP session is established, each sent packet is assigned a number called a "sequence number." The receiving side sends an "ACK packet" confirming receipt up to which number. This guarantees that packets have been reliably received. Also, if the sender does not receive an ACK packet within a certain time, the same packet is retransmitted. These TCP session mechanisms are handled at the TCP layer provided by Linux, so applications communicating over TCP do not need to worry about packet retransmission processing.
TCP socket communication can be imagined as a power strip (Figure 4.30). A power strip is prepared for each server port number, and multiple clients can be connected. When a client connects to a listening socket, a new listening socket is added. A server application handles multiple connections on a single port number, but client applications prepare their own port number for each connection.
The file /etc/services contains the mapping between application names and port numbers.
$ cat /etc/services
# Network services, Internet style
#
# Updated from https://www.iana.org/assignments/service-names-port-numbers/service-names-port-numbers.xhtml .
#
# New ports will be added on request if they have been officially assigned
# by IANA and used in the real-world or are needed by a debian package.
# If you need a huge list of used numbers please install the nmap package.

tcpmux          1/tcp                           # TCP port service multiplexer
echo            7/tcp
echo            7/udp
discard         9/tcp           sink null
discard         9/udp           sink null
systat          11/tcp          users
daytime         13/tcp
daytime         13/udp
netstat         15/tcp
qotd            17/tcp          quote
chargen         19/tcp          ttytst source
chargen         19/udp          ttytst source
ftp-data        20/tcp
ftp             21/tcp
fsp             21/udp          fspd
ssh             22/tcp                          # SSH Remote Login Protocol
telnet          23/tcp
smtp            25/tcp          mail
In systems with many network connections such as web servers exposed to the internet, the number of sockets simultaneously usable on the server may reach its limit, preventing further client connections. The parameters that determine these limits include the "file descriptor count" limit set per process and the "file object count" limit set for the entire server. Here I explain how to change these parameters. The file descriptor count limit: Linux has a feature called ulimit that restricts the number of files each process can open simultaneously. To be precise, this is the limit on the number of file descriptors each process can use. File descriptors are labels managed by the Linux kernel that identify files a process has open. In Linux, due to the virtual filesystem feature, not only files on physical disks but also resources such as standard I/O and TCP sockets are handled virtually as files. Therefore, file descriptors are also needed when using these resources. Consequently, for processes that heavily use network communication, such as HTTP daemons, the number of simultaneously connectable clients may be limited by the ulimit file descriptor count restriction. For systems where many network connections are expected, it is necessary to increase the ulimit file descriptor count limit. The maximum configurable value is determined by the kernel parameter fs.nr_open, with a default value of 1048576. The maximum configurable value for this kernel parameter is 2147483584.
When setting limits for a user's login shell, describe the content of Figure 4.32 in the configuration file /etc/security/limits.conf. "soft" (soft limit) is the actual limit value, and "hard" (hard limit) is the upper limit that individual users can change with the ulimit command.
When setting limits for user login shells, describe the content of Figure 4.32 in the configuration file /etc/security/limits.conf. "soft" (soft limit) is the actual limit value, and "hard" (hard limit) is the upper limit that individual users can change with the ulimit command.
For services managed by systemd that auto-start at server startup rather than user login shells, describe the setting value in the systemd configuration file. In the [service] section of the relevant service configuration file, write something like "LimitNOFILE=65536".
$ cat /usr/lib/systemd/system/ssh.service
[Unit]
Description=OpenBSD Secure Shell server
Documentation=man:sshd(8) man:sshd_config(5)
After=network.target auditd.service
ConditionPathExists=!/etc/ssh/sshd_not_to_be_run

[Service]
EnvironmentFile=-/etc/default/ssh
ExecStartPre=/usr/sbin/sshd -t
ExecStart=/usr/sbin/sshd -D $SSHD_OPTS
ExecReload=/usr/sbin/sshd -t
ExecReload=/bin/kill -HUP $MAINPID
KillMode=process
Restart=on-failure
RestartPreventExitStatus=255
Type=notify
RuntimeDirectory=sshd
RuntimeDirectoryMode=0755

[Install]
WantedBy=multi-user.target
Alias=sshd.service
To check the file descriptors in use by each process, run the following command with the process ID as <pid>:
$ ps
    PID TTY          TIME CMD
    697 pts/0    00:00:00 bash
   2632 pts/0    00:00:00 ps
$ ls -l /proc/697/fd
total 0
lrwx------ 1 bluen bluen 64 Aug 11 17:06 0 -> /dev/pts/0
lrwx------ 1 bluen bluen 64 Aug 11 17:06 1 -> /dev/pts/0
lrwx------ 1 bluen bluen 64 Aug 11 17:06 2 -> /dev/pts/0
lrwx------ 1 bluen bluen 64 Aug 11 17:06 255 -> /dev/pts/0
As described earlier, Linux's virtual filesystem feature handles various system resources as virtual files. The Linux kernel internally prepares variables called file objects to store information about such virtual files. When user processes open files excessively or make a very large number of network connections, the file objects used by the kernel increase, eventually leading to a system memory shortage. While restricting file descriptor counts helps prevent such issues, Linux also places limits on the total number of file objects usable system-wide in addition to per-process file descriptor counts. The file object count limit is configured with the kernel parameter fs.file-max. Practically, any value can be set, but since this is a parameter to protect against system memory exhaustion, avoid setting excessively large values. The default value is automatically determined based on the amount of physical memory installed in the server.
Chapter 5: Process Management
$ ps aux
$ ps aux | column -t
USER PID %CPU %MEM VSZ RSS TTY STAT START TIME COMMAND
root 1 0.0 0.3 167564 12836 ? Ss 13:15 0:01 /sbin/init
root 2 0.0 0.0 2324 1192 ? Sl 13:15 0:00 /init
root 5 0.0 0.0 2352 80 ? Sl 13:15 0:00 plan9 --control-socket 6 --log-level 4 --server-fd 7 --pipe-fd 9 --log-truncate
root 42 0.0 0.4 48384 15972 ? S<s 13:15 0:00 /lib/systemd/systemd-journald
root 68 0.0 0.1 22580 6188 ? Ss 13:15 0:00 /lib/systemd/systemd-udevd
root 79 0.0 0.0 4496 176 ? Ss 13:15 0:00 snapfuse /var/lib/snapd/snaps/bare_5.snap /snap/bare/5 -o ro,nodev,allow_other,suid
root 82 0.0 0.0 4852 1908 ? Ss 13:15 0:00 snapfuse /var/lib/snapd/snaps/core22_766.snap /snap/core22/766 -o ro,nodev,allow_other,suid
root 87 0.0 0.0 4628 180 ? Ss 13:15 0:00 snapfuse /var/lib/snapd/snaps/gtk-common-themes_1535.snap /snap/gtk-common-themes/1535 -o ro,nodev,allow_other,suid
root 91 0.0 0.0 4496 156 ? Ss 13:15 0:00 snapfuse /var/lib/snapd/snaps/nmap_3031.snap /snap/nmap/3031 -o ro,nodev,allow_other,suid
root 99 0.0 0.0 4628 200 ? Ss 13:15 0:00 snapfuse /var/lib/snapd/snaps/nmap_3077.snap /snap/nmap/3077 -o ro,nodev,allow_other,suid
root 102 0.0 0.0 4496 204 ? Ss 13:15 0:00 snapfuse /var/lib/snapd/snaps/snapd_19122.snap /snap/snapd/19122 -o ro,nodev,allow_other,suid
root 106 0.0 0.0 4784 1848 ? Ss 13:15 0:03 snapfuse /var/lib/snapd/snaps/snapd_19457.snap /snap/snapd/19457 -o ro,nodev,allow_other,suid
root 111 0.0 0.0 4752 1852 ? Ss 13:15 0:01 snapfuse /var/lib/snapd/snaps/ubuntu-desktop-installer_1104.snap /snap/ubuntu-desktop-installer/1104 -o ro,nodev,allow_other,suid
systemd+ 127 0.0 0.3 25548 12612 ? Ss 13:15 0:00 /lib/systemd/systemd-resolved
root 151 0.0 0.0 4324 2792 ? Ss 13:15 0:00 /usr/sbin/cron -f -P
message+ 153 0.0 0.1 9108 5024 ? Ss 13:15 0:00 @dbus-daemon --system --address=systemd: --nofork --nopidfile --systemd-activation --syslog-only
root 168 0.0 0.4 30156 18488 ? Ss 13:15 0:00 /usr/bin/python3 /usr/bin/networkd-dispatcher --run-startup-triggers
root 173 0.0 0.2 236644 9140 ? Ssl 13:15 0:00 /usr/libexec/polkitd --no-debug
syslog 175 0.0 0.1 222400 5116 ? Ssl 13:15 0:00 /usr/sbin/rsyslogd -n -iNONE
root 183 0.0 1.5 1614204 61840 ? Ssl 13:15 0:06 /usr/lib/snapd/snapd
root 190 0.0 0.1 15348 7312 ? Ss 13:15 0:00 /lib/systemd/systemd-logind
root 195 0.0 0.1 15116 6856 ? Ss 13:15 0:00 /lib/systemd/systemd-machined
root 196 0.0 0.3 392672 14520 ? Ssl 13:15 0:00 /usr/libexec/udisks2/udisksd
root 197 0.0 0.1 16492 5676 ? Ss 13:15 0:00 /sbin/wpa_supplicant -u -s -O /run/wpa_supplicant
root 253 0.0 1.0 124844 39564 ? Ssl 13:15 0:00 /usr/bin/python3 /usr/sbin/firewalld --nofork --nopid
root 321 0.0 0.4 255428 17368 ? Ssl 13:15 0:00 /usr/sbin/NetworkManager --no-daemon
root 335 0.0 0.6 1547712 27212 ? Ssl 13:15 0:00 /usr/sbin/libvirtd
root 348 0.0 0.5 107248 21200 ? Ssl 13:15 0:00 /usr/bin/python3 /usr/share/unattended-upgrades/unattended-upgrade-shutdown --wait-for-signal
root 355 0.0 0.0 3236 1064 hvc0 Ss+ 13:15 0:00 /sbin/agetty -o -p -- \u --noclear --keep-baud console 115200,38400,9600 vt220
root 369 0.0 0.2 15444 8592 ? Ss 13:15 0:00 sshd: /usr/sbin/sshd -D [listener] 0 of 10-100 startups
root 374 0.0 0.0 3192 1088 tty1 Ss+ 13:15 0:00 /sbin/agetty -o -p -- \u --noclear tty1 linux
root 398 0.0 0.5 197336 20648 ? Ss 13:15 0:00 /usr/sbin/apache2 -k start
mysql 426 0.0 2.6 1608300 102652 ? Ssl 13:15 0:03 /usr/sbin/mariadbd
www-data 428 0.0 0.2 197848 10548 ? S 13:15 0:00 /usr/sbin/apache2 -k start
www-data 429 0.0 0.2 197848 10548 ? S 13:15 0:00 /usr/sbin/apache2 -k start
www-data 430 0.0 0.2 197848 10548 ? S 13:15 0:00 /usr/sbin/apache2 -k start
www-data 431 0.0 0.2 197848 10548 ? S 13:15 0:00 /usr/sbin/apache2 -k start
www-data 432 0.0 0.2 197848 10548 ? S 13:15 0:00 /usr/sbin/apache2 -k start
root 695 0.0 0.0 2332 108 ? Ss 13:15 0:00 /init
root 696 0.0 0.0 2348 116 ? S 13:15 0:00 /init
hogehoge 697 0.0 0.1 6312 5448 pts/0 Ss 13:15 0:00 -bash
root 698 0.0 0.1 7552 4984 pts/1 Ss 13:15 0:00 /bin/login -f
bluhogehoge en 739 0.0 0.2 17188 9684 ? Ss 13:15 0:00 /lib/systemd/systemd --user
bluhogehoge en 754 0.0 0.0 169508 3864 ? S 13:15 0:00 (sd-pam)
hogehoge 768 0.0 0.1 34252 6280 ? Ssl 13:15 0:00 /usr/bin/pipewire
hogehoge 769 0.0 0.1 18276 6504 ? Ssl 13:15 0:00 /usr/bin/pipewire-media-session
hogehoge 770 0.0 0.1 6124 4884 pts/1 S+ 13:15 0:00 -bash
rtkit 772 0.0 0.0 154000 1532 ? SNsl 13:15 0:00 /usr/libexec/rtkit-daemon
hogehoge 783 0.0 0.1 8316 4100 ? Ss 13:15 0:00 /usr/bin/dbus-daemon --session --address=systemd: --nofork --nopidfile --systemd-activation --syslog-only
root 959 0.0 0.0 4852 1640 ? Ss 13:20 0:00 snapfuse /var/lib/snapd/snaps/core22_858.snap /snap/core22/858 -o ro,nodev,allow_other,suid
root 1105 0.0 0.0 4984 1660 ? Ss 13:21 0:01 snapfuse /var/lib/snapd/snaps/ubuntu-desktop-installer_1200.snap /snap/ubuntu-desktop-installer/1200 -o ro,nodev,allow_other,suid
root 1192 0.0 0.0 4776 3284 ? Ss 13:21 0:00 /bin/bash /snap/ubuntu-desktop-installer/1200/bin/subiquity-server
root 1222 0.0 2.3 1179408 90456 ? Sl 13:21 0:12 /snap/ubuntu-desktop-installer/1200/usr/bin/python3.10 -m subiquity.cmd.server --use-os-prober --storage-version=2 --postinst-hooks-dir=/snap/ubuntu-desktop-installer/1200/etc/subiquity/postinst.d
root 1255 0.1 0.9 43184 37720 ? S 13:21 0:17 python3 /snap/ubuntu-desktop-installer/1200/usr/bin/cloud-init status --wait
root 2010 0.0 0.5 293004 20316 ? Ssl 13:42 0:00 /usr/libexec/packagekitd
hogehoge 2686 0.0 0.0 7484 3256 pts/0 R+ 17:11 0:00 ps aux
hogehoge 2687 0.0 0.0 3320 1068 pts/0 S+ 17:11 0:00 column -t
A process forked from a parent process transitions through the various states in Figure 5.3. The "STAT" symbols in Figure 5.3 correspond to the first character (R, D, S, T, Z) in the "STAT" column of Figure 5.2.
"R (runnable/running)" is the state where the process has been allocated CPU time and is executing. Strictly speaking, multiple processes take turns using the CPU, so there is the moment when the CPU is actually being used (running state) and the moment waiting for CPU allocation (runnable state). The ps command displays both of these as "R." "D (uninterruptible wait state)" is the state where the process is waiting for disk I/O to complete after issuing a disk access command. If many processes exist in this state, it is possible that disk I/O load is high system-wide. Also, processes in this state cannot be forcibly terminated by signals. If I/O does not complete due to a device driver fault and doesn't result in an error either, "D" state processes may become stuck and problematic. In such cases, basically the only option is to restart the system. "S (interruptible wait state)" is the state where the program is voluntarily sleeping. This is a state like a web server process waiting without doing anything until a client accesses it. "T (stopped state)" is a state where the process is temporarily paused after receiving a STOP signal. Sending a CONT signal returns the process to the running state. The final "Z (zombie state)" is the state where program execution has completed. A process that has completed execution sends a CHLD signal to the parent process and stops in this state. Afterward, when the parent process that received the CHLD signal completes the child process completion check, the process disappears entirely. If the parent process becomes abnormal and cannot properly receive the CHLD signal, the zombie-state process remains. Zombie-state processes are displayed with "<defunct>" after the process name in the ps command.
Processes in the "R (runnable/running)" state are allocated CPU time in turn. At this point, an internal priority is set to manage the CPU time allocated to each process. The smaller the priority value, the higher the execution priority and the longer the CPU allocation time. Process priority is automatically adjusted by the kernel based on process execution status, so it cannot be changed at the user level. Instead, the process "Nice level" can be set to indirectly adjust priority changes. The Nice level ranges from -20 to 19 (-20 being highest priority, 19 being lowest priority), with a default value of 0. Specify the Nice level when launching a process using the nice command. Alternatively, use the renice command to change the Nice level of a running process.
In Linux, a mechanism called ulimit places certain limits on various resources that each process can use.
In systemd, startup processing similar to Figure 5.5 is performed by "Units." Each processing step that was performed in shell scripts in SysVinit is defined as an individual Unit, and dedicated programs handle each Unit's processing. There are several types of Units, some automatically generated by systemd and some explicitly defined by system administrators. The main types of Units are as shown in Table 5.3, and the type of Unit is distinguished by the extension part of the Unit name. System administrators mainly configure and manage "service" type Units. These are Units for starting services such as sshd (SSH daemon) and httpd (HTTP daemon).
Unit definition files are stored in two directories: /usr/lib/systemd/system (default configuration content) and /etc/systemd/system (content changed from defaults). The Unit name directly becomes the configuration file name, such as "sshd.service" and "httpd.service." If configuration files exist in both directories, the one under /etc takes precedence. To change the default configuration, copy the configuration file from /usr/lib to /etc and then make changes. Since the default configuration file remains in place, deleting the copied file easily reverts to the default configuration. When adding/changing only part of the configuration for an existing configuration, you can create a subdirectory named <Unit-name>.d under /etc/systemd/system and save a configuration file there with any filename.
First, the configuration file of each Unit has dependencies between Units set, specifying the prerequisite Units when running a particular Unit. systemd starts by looking at the configuration file of a Unit named "default.target" and tracing the prerequisite Units in order, creating a list of Units to run for the entire system.
The configuration file default.target that systemd checks first is actually a symbolic link to another configuration file such as graphical.target or multi-user.target, and changing this link corresponds to changing the runlevel at startup.
I explained earlier that dependencies are set inside the Unit configuration files, but in addition, creating symbolic links to other Units' configuration files in a subdirectory named <Unit-name>.d also sets dependencies. The enable/disable of service auto-start uses this mechanism.
In systemd, commands to start/stop services are described inside the Unit configuration file. Figure 5.8 is an excerpt of the main parts of the httpd service configuration file /usr/lib/systemd/system/httpd.service. ExecStart, ExecReload, and ExecStop are the commands to start, reload, and stop this service, respectively. WantedBy specifies the Unit to set a dependency with when auto-start is enabled. The dependency on multi-user.target set earlier when running "systemctl enable" was due to this specification.
$ cat /usr/lib/systemd/system/ssh.service
[Unit]
Description=OpenBSD Secure Shell server
Documentation=man:sshd(8) man:sshd_config(5)
After=network.target auditd.service
ConditionPathExists=!/etc/ssh/sshd_not_to_be_run

[Service]
EnvironmentFile=-/etc/default/ssh
ExecStartPre=/usr/sbin/sshd -t
ExecStart=/usr/sbin/sshd -D $SSHD_OPTS
ExecReload=/usr/sbin/sshd -t
ExecReload=/bin/kill -HUP $MAINPID
KillMode=process
Restart=on-failure
RestartPreventExitStatus=255
Type=notify
RuntimeDirectory=sshd
RuntimeDirectoryMode=0755

[Install]
WantedBy=multi-user.target
Alias=sshd.service
Historically, Linux's memory management mechanism was designed based on the x86 architecture. The current x86_64 architecture is an extension of that. So here I first explain memory management in the x86 architecture, i.e., the 32-bit version of the Intel architecture. Specifically, think of it as an environment where 32-bit Linux is installed on either an x86 architecture server or an x86_64 architecture server.
First, what is the difference between 32-bit and 64-bit versions? To understand this, you need to grasp the difference between "logical address space" and "physical address space." In short, the biggest difference between 32-bit and 64-bit versions is the number of digits in the logical address space. In the 32-bit version, 32-bit addresses are used, so the values available for logical addresses range from "0x00000000 to 0xFFFFFFFF" in hexadecimal. This amounts to exactly 4GB.
Let me explain the difference between "logical address space" and "physical address space" again. Physical address space refers to addresses that specify the physical memory area installed in the server. For example, on a server with 16GB of physical memory, the physical address space is 0 to 16GB. The lower part of Figure 5.10 shows the data allocation in physical address space using 16GB of physical memory as an example.
The kernel's own program code (kernel code) and data area use physical addresses from 1MB to 896MB. This area of physical memory is called "Low memory." From 896MB onward, it is used for memory used by user processes and as disk cache. This area is called "High memory." The unused portion of Low memory is also used for user process memory and disk cache, but conversely, the kernel never uses High memory. The range from 0 to 1MB is reserved for hardware functions such as the system BIOS. On the other hand, each user process on Linux has a virtual address space of 0 to 4GB called logical address space. This is the 32-bit address of "0x00000000 to 0xFFFFFFFF" explained earlier. User processes access memory by specifying logical addresses. However, these are just virtual addresses, and corresponding physical memory does not necessarily exist for each address. When a user process specifies a logical address to access memory, the kernel allocates physical memory as needed. The kernel maintains a "translation table" for each process that converts logical addresses to corresponding allocated physical memory physical addresses. This translation table is called a "page table." Allocating physical memory to a logical address is called "mapping memory." The upper part of Figure 5.10 schematically shows memory mapping. In each process's logical address space, physical memory used by each process is mapped to the 0 to 3GB area. In the 3GB to 4GB area, the Low memory used by the kernel is mapped commonly across all processes. This 3GB to 4GB area is needed when a CPU running a user process switches execution to kernel code. When a user process calls kernel functionality via a system call, the CPU running the user process switches processing to the kernel code mapped at 3GB to 4GB when kernel processing is required. In addition to system calls, processing switches to kernel code also occur during process switching, as explained next.
At any given moment, the page table of the process currently executing on the CPU is active. When a user process specifies a logical address, the CPU references the active page table to access the corresponding physical memory. The conversion from logical address to physical address is handled by hardware called MMU (Memory Management Unit). When switching the process running on the CPU, processing temporarily moves to the kernel code in the 3GB to 4GB area. There, the kernel newly activates the page table of the next process to run. This switches processing to the next process. At this time, since the Low memory used by the kernel is commonly mapped across all processes in the 3GB to 4GB area, switching page tables has no effect on kernel code execution.
Normally the kernel doesn't need nearly 900MB of memory, but in rare cases when using special device drivers that use large amounts of memory, Low memory can run out and cause problems with kernel operation. This is a somewhat tricky problem where only the Low memory portion becomes insufficient even though the overall physical memory has room to spare. As explained below, in the x86_64 architecture (64-bit version) environment, there is no limit on the memory capacity the kernel can use. Since 64-bit CPU architectures have become mainstream in recent years, using the 64-bit version of Linux is basically recommended. For large database systems and other applications where a single user process requires more than 3GB of memory, using the 64-bit version may also be mandatory.
I often get questions from programmers here. For example, what happens when program code running in an environment with 1GB of free physical memory allocates more than 1GB of memory with the malloc() function? Actually, the memory allocation succeeds. Afterward, as the program code writes data to the allocated memory, physical memory is allocated. When ultimately no physical memory can be secured for allocation, the "OOMKiller" described later operates. This kernel behavior is called "memory overcommit." I sometimes receive feedback like "This makes it hard to know when memory shortage will occur — isn't there a better way?" From a programmer's perspective, having an error occur at the time of malloc() allocation makes exception handling simpler. This point has long been debated among kernel developers. The conclusion is that memory overcommit remains because "there are many programs that allocate large amounts of memory with malloc() just in case but hardly use it, so the memory overcommit feature is useful."
The page table memory mapping mechanism described so far is basically the same in x86_64 architecture. The difference in x86_64 architecture is that 64-bit addresses are used for logical addresses. A 64-bit address space amounts to 16EB (exabytes) in capacity, which is practically infinite. Therefore, there is no need to split the 4GB logical address space into 3GB and 1GB, and the memory size restrictions described above do not occur. Within the limits of physical memory capacity, both user processes and the kernel can use as much memory as needed. Also, in x86_64 architecture environments, there is no distinction between Low memory and High memory. All physical memory is treated as Low memory.
Linux uses most of the free physical memory capacity as disk cache. Data in the disk cache remains even after file access is complete and is not released, so after large file access, the free physical memory appears to have decreased significantly. However, if processes run short of memory, disk cache is released as needed. Therefore, for practical free memory capacity, the disk cache portion should be considered as free capacity.
Linux uses most of the free physical memory capacity as disk cache. Data in the disk cache remains even after file access is complete and is not released, so after large file access, the free physical memory appears to have decreased significantly. However, if processes run short of memory, disk cache is released as needed. Therefore, for practical free memory capacity, the disk cache portion should be considered as free capacity.
$ free
               total        used        free      shared  buff/cache   available
Mem:         3897284      681468     1831308        5736     1384508     2993364
Swap:        1048576           0     1048576
"total" is the overall physical memory capacity, "used" is the capacity used for some purpose, and "free" is capacity not used at all. On the other hand, "available" shows the practical free capacity — it subtracts disk cache and similar items that can be released as needed. "buff/cache" is the capacity currently being used as disk cache. Since some portion of the disk cache cannot be released for various reasons, "available" shows only the actually releasable capacity subtracted.
The disk swap area is a mechanism that evacuates part of the physical memory to the swap area when free physical memory runs short to secure the necessary free capacity. Content evacuated to the swap area is read back into physical memory when a process accesses it. Writing physical memory to the swap area is called "swap out," and reading from the swap area back to physical memory is called "swap in."
Device drivers are kernel modules built into the kernel, so they use the kernel's memory area. Also, the kernel's memory area is never swapped out to the swap area.
The ext4 and XFS filesystems divide the entire disk area used as a filesystem into multiple groups and place "metadata" and "actual data" in each group (Figure 5.13). Each group is called a "block group" (ext4 filesystem) or "allocation group" (XFS filesystem). Metadata is the configuration of the entire filesystem and catalog information for individual files, while actual data is the actual file contents. The area for actual data is called a "data block."
Metadata that is useful to understand for filesystem management includes the "superblock" and "inode area." The superblock records configuration information for the entire filesystem, including filesystem option parameters. If the superblock is corrupted, the entire filesystem becomes unusable, so the same superblock is recorded in multiple areas within the filesystem. The fsck.ext4 command or xfs_repair command, which checks filesystem integrity, compares the contents of multiple superblocks and can repair a corrupted first superblock using the second superblock. The inode area records information about individual files (access permissions, timestamps, pointers to data blocks, etc.). One inode is used per file. In the ext4 filesystem, the proportion of the inode area is specified when creating the filesystem. If the inode area runs out, no more files can be created even if there is free space in the data blocks. If many files are expected to be stored in the filesystem, a sufficiently large inode area must be secured initially. In the XFS filesystem, inode areas are secured as needed, so this is not a concern. Also, in both ext4 and XFS filesystems, "inode size" requires attention. This specifies the size of each inode, typically values like 128 bytes, 256 bytes, or 512 bytes specified when creating the filesystem. In ext4 and XFS filesystems, extended file attributes such as SELinux context information and ACL (Access Control List) can be set for each file, and this information is stored in the inode. For files with many extended file attributes, if the inode size is insufficient, multiple inodes may need to be used internally, degrading access performance. For example, with an inode size of 256 bytes, about 100 bytes of extended file attributes can be stored per file.
Writes to files on the filesystem go through the Linux disk cache. File update content is written to the disk cache in server memory, then periodically written in bulk to the physical disk. At this point, for example, if the server suddenly stops while metadata is being written from the disk cache to the physical disk, half-updated metadata remains on disk, causing metadata inconsistency and making the filesystem unusable. Journaling filesystems provide a method to reliably recover from such metadata inconsistencies by using journal logs. Both ext4 and XFS filesystems are journaling filesystems.
Chapter 6: Linux Server Troubleshooting
6.1.3 System Log Collection
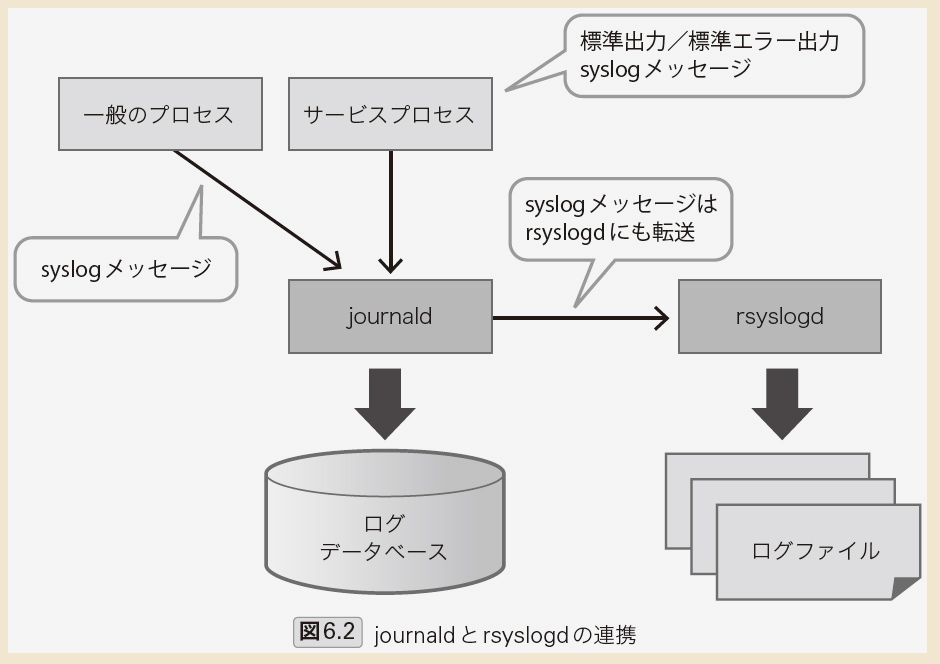
The output destinations for log messages from user processes running on Linux can broadly be divided into three categories:
- Their own log files 2. Standard output / standard error output 3. syslog messages. Category 1 consists of messages the process outputs to its own log file. These are not managed by journald or rsyslogd. Category 2 generally consists of messages displayed on the terminal screen that launched the process. For daemon processes running in the background, in traditional environments these were mostly configured to be discarded. However, for service processes launched as systemd Units, category 2 messages are now also received by journald and stored in its log database. Category 3 consists of messages output by program code within the process via the syslog() function, commonly called syslog messages. For category 3, journald receives the messages and stores them in its log database, then also forwards the same messages to rsyslogd. As a result, rsyslogd receives syslog messages from all processes. These messages are then output to various log files based on the configuration file /etc/rsyslogd.conf. Meanwhile, journald receives not only syslog messages from all processes but also the standard output / standard error output content of service processes, storing all of these in its own log database. The contents of journald's log database can be searched using the journalctl command. However, journald's log database is lost when the server is restarted. Therefore, you need to use journalctl for checking the status of running services, and refer to log files output by rsyslogd for checking older information before a server restart when a problem occurred.
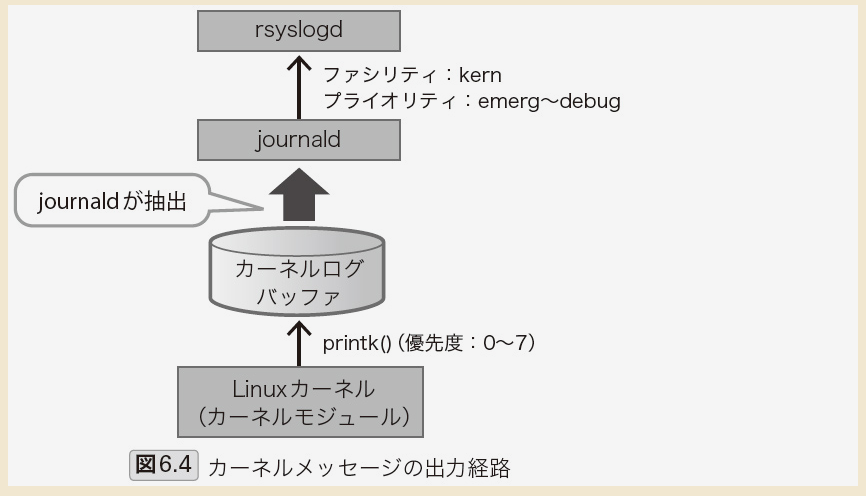
Log messages output by the kernel and kernel modules (device drivers) are first stored in the kernel log buffer (a buffer area in memory) inside the kernel. This is a mechanism to ensure kernel log messages are not lost even when journald and rsyslogd are not running. Especially at system startup, the kernel outputs log messages before journald and rsyslogd start. These are temporarily accumulated in the kernel log buffer and then output to log files when journald and rsyslogd start. The current content of the kernel log buffer can be checked with the dmesg command. Also, the content of the kernel log buffer immediately after system startup is also recorded in the log file /var/log/dmesg.
Related to this mechanism, a little caution is needed when reading kernel logs at system startup. journald and rsyslogd start as systemd Units (services) at system startup. When these start, the messages that had accumulated in the kernel log buffer are all output to log files at once. For this reason, when checking startup messages from the system log file /var/log/messages, kernel logs with identical timestamps are recorded together. These timestamps are not the actual time the logs were output, but rather the time when journald and rsyslogd started and wrote to the log file.
That's all.